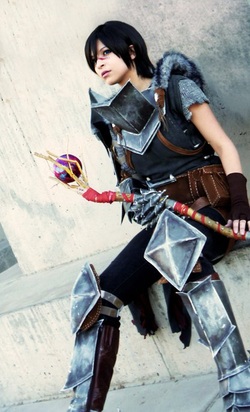
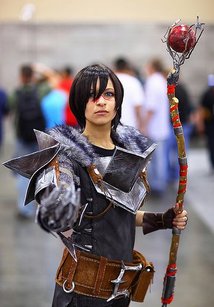
(Hawke) Armor Tutorial/Process

Many cosplayers and interested parties have been inquiring about the process of how I made my Champion Hawke armor (and Fenris's armor.) So I decided to throw up a small tutorial to better explain the project.
I'd to first start out by saying that there are two things that are 'key' to making armor. Shape & Paint. I have found in my experience in costuming and prop making, that you can make any material (cardboard, paper, foam) look believable as heavy metal, leather, or steel with the right shapes and the right paint job.
Shape.
I say shape is important, but mostly on the cosplaying standpoint. Shape is important because you are trying to make it look exactly as it is in the game/anime/movie/etc... So you need to constantly look at your reference images and cut your shapes accordingly. Measure out how big the armor is to your character and then apply it to your scale.
Paint.
The paint job makes the object look believable. I never really see a costume piece begin to come together until I start to paint it. Even if the size or shape is off, even if the piece is broken -- it still looks impressive with a well down paint job.
Now let's get started!
Material's used:
-Craft Foam
-Mod Podge
-Hot Glue
-Silver Chrome Spray Paint (My favorite brand is Montana Gold)
-Rustoleum Silver Hammered Spray Paint
-Black, Silver, and Brown acrylic paint
I based my Craft Foam armor process off of this amazing tutorial.
READ IT BEFORE PROCEEDING
-Craft Foam
-Mod Podge
-Hot Glue
-Silver Chrome Spray Paint (My favorite brand is Montana Gold)
-Rustoleum Silver Hammered Spray Paint
-Black, Silver, and Brown acrylic paint
I based my Craft Foam armor process off of this amazing tutorial.
READ IT BEFORE PROCEEDING
- Step One
I start by cutting out all of the pieces of armor from craft foam. For dimensional shapes, I cut out the flat surfaces and hot glue them together. It's similar to a pepakura process (kind like origami.) Also at this stage, I add any 'metal nails' in the armor by dotting the craft foam with hot glue. - Step Two
Mod Podging the craft foam. 1-2 coats, both sides, using a foam brush (no streaks or hair.) I use Mod Podge instead of elmers or sobo glue + water (as mentioned in the above tutorial) because it takes less coats to seal. And I am a very impatient woman. - Step Three
Silver spray paint base. I use Montana sprays because they are magical, but I also love Rustoleom (kylon is okay I guess, but its metallics are not shiny enough for me sometimes). Both sides, one or two coats. - Step Four
Just to show you guys; I lay my spray paint on THICK, because the foam absorbs it fast, and to make it look like welded metal. - Step Five
I use the rust hammer spray paint to get a good metal feel. I use it sparingly, and almost sporadically. Don't paint the whole thing one solid coat of this, you want it to look various like metal texture actually does. - Step Six
QUICKLY before the paint drys, scratch back in into the hammered paint to reveal the silver coat beneath (using edges of paper, or bits of sandpaper). Makes it look all worn. I also use a technique of a crumpled paper towel, dabbed at the paint to take away smudges. - Step Seven
Getting some of that silver spray paint on a brush, I go back and add some silver to the edges of the pieces. Basically wherever the armor would logically be cleaner (outer creases and such, use your reference pictures. In general, the edges of things are usually chipped silver. - Step Eight
Ta da! Looks good so far, no? - Step Nine
This is the ‘weathering’ part. I use silver paint here and then a mixture of brown, red and black. (This is not a step, just an explanation of what we are using next.) - Step Ten
Using the silver paint, I dab a bunch on and then IMMEDIATELY wipe it away. Just use a paper towel and rub in some silver paint to make it seem washed. - Step Eleven
Pretty much the same idea here, just rub the brown/red/black mixture into the places that would be logically dirty. Again use your reference pictures. I apply the paints in the creases and corners, in dents and things before wiping away at with a paper towel. Once you start this process, its easy to understand as you go.
Finished!

And that's the process! Nothing difficult, just slightly time consuming. I used this same exact process for Fenris's armor as well, it was simply adapted to his paint look. (No hammered spray paint, no browns and reds. Just silver and black dirt.) It can technically be used for any armor set, with a change in the paint colors accordingly.
Good Luck to all you Armor Maker's!
Good Luck to all you Armor Maker's!

